8 March
Before sending a message, check if there are local contact details for a Sri Chinmoy Centre in your country (see the list below). If you don't see your country, then please use this form and we'll make sure it gets to the right person.
For copyright and media requests, you can also use this form.
Local contacts: Australia • Bangladesh বাংলাদেশ • Bosnia and Herzegovina • Brazil Brasil • Bulgaria България • Canada • Czech Republic Česko • Croatia Hrvatska • Estonia • France • Finland Suomi • Georgia საქართველო • Great Britain • Ghana • Greece Ελλάδα • Hungary • Iceland Ísland • India • Indonesia • Ireland • Italy Italia • Japan 日本 • Kenya • Macedonia • Mongolia Монгол • Nepal नेपाल • Netherlands Nederland • New Zealand • Portugal • Puerto Rico • Russia Россия • Serbia • Singapore • Slovenia Slovenija • Slovakia Slovensko • South Africa • United States
• German-speaking countries/Deutschsprachige Länder Germany, Austria and Switzerland
• Spanish-speaking countries/Países de habla hispana Spain, Central and South America
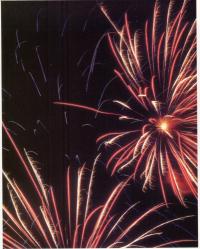
Fabulous fireworks! Photographing them is easy, once you know the techniques...
by: Prashphutita A. Greco
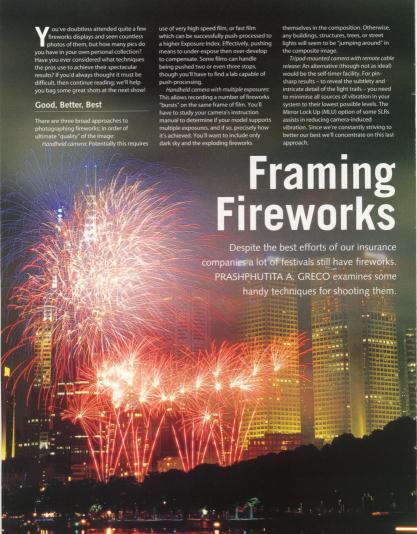 You've doubtless attended quite a few fireworks displays - and seen countless photographs - but how many pics. do you have in your own personal collection? Have you ever considered what techniques the pros use to achieve their spectacular results? If you'd always thought it must be difficult, then continue reading: we'll help you bag some great shots at the next show!
Good, Better, Best
There are three broad approaches to photographing fireworks; in order of ultimate "quality" of the image:
3.) Handheld camera. Potentially requires use of very high speed film, or fast film which can be successfully push-processed to a higher Exposure Index. Effectively, pushing means to under-expose then over-develop to compensate. Some films can handle being pushed 2 or even 3 stops, though you'll have to find a Lab capable of push-processing for you.
2.) Handheld camera, as per 3.), and with multiple exposures. This allows recording a number of fireworks "bursts" on the same frame of film. You'll have to study your camera's instruction manual to determine if your model supports multiple exposures, and, if so, precisely how it's achieved. Here, you'll want to include only dark sky and the exploding fireworks themselves in the composition. Otherwise, any buildings, structures, trees, street lights, etc. will seem to be "jumping around" in the composite image.
1.) Tripod-mounted camera with remote cable release; alternatively, though not as ideal, would be the self-timer facility. For pin-sharp results - to reveal the subtlety and intricate detail of the light trails - you need to minimise all sources of vibration in your system to their lowest possible levels. The Mirror Lock Up (MLU) option of some SLRs assists in reducing camera-induced vibration.
Since we're constantly striving to better our best, we'll concentrate on approach 1.).
Automation, be Gone!
It's a decided advantage if you can operate your camera in Manual Mode. Oh, dare I say it, ensure your camera doesn't automatically fire its flash. There's only one thing that would definitely achieve: a rapid flattening of your batteries!
1.) Focus With wide-angle or normal lenses, you can simply set the focus at infinity (denoted by the figure "8" symbol lying sideways on lens barrels) and just fugedaboudit. With most lenses, you'd rotate the focus ring fully anti-clockwise (viewed from your position looking through the viewfinder). Beware, though, that some lenses permit focusing beyond infinity (to allow for expansion of the lens mechanism with temperature). When you suddenly realise that you're working in near-darkness, you'll be glad you figured out this stuff ahead of time!
If you're using a telephoto lens (or winding out your zoom) to give the feeling of being "close" to the explosions, then (carefully) set the focus to where the action is happening. Depth Of Field (DOF) decreases markedly with increasing focal length.
2.) Exposure Large areas of dark sky will fool your camera's Auto Exposure (AE) sensors into attempting to over-expose, since they're calibrated to render a scene as mid-tone grey. Most likely, a camera in Program Mode would set the aperture at (or near) wide open, and warn you that it's selected a non-handholdable shutter speed. Here's a guideline for the aperture to select with various speed films:
Film ISO Rating Aperture
100 f/11
200 f/16
400 f/22 *
800 f/32 *
* Your lens may only be capable of stopping down to f/16. If planning to shoot slides, choose slower film to avoid over-exposure. With print film, the newer emulsions can handle up to 3 or even 4 stops of over-exposure, so this isn't as critical.
How long to keep the shutter open? About 5, or 10, or even 20 "potatoes" ought to be in the ballpark (seriously!), allowing the capture of several fireworks "pops" on the same frame. Due to their unpredictable nature, the best policy with fireworks is to bracket the shutter speeds widely, tending towards shorter times when the explosions are brighter and/ or more numerous (such as during the finale). Nearly all the pics. accompanying this article were taken with cameras that only timed up to 1s, so a Bulb setting and keeping the shutter open for what "felt" right worked well.
If you've got an Off The Film (OTF) metering camera (eg. Olympus OM-2 series, etc.) then getting the correct exposure is as easy as selecting "A" (Auto) mode. The silicon photo cells will detect when enough light has accumulated on the film itself, then close the shutter for you.
Unless you want to have correct exposure for, say, city buildings as well, then a number of different exposures are likely to be acceptable. In fact, they'll each have their own particular advantages, in terms of artistic effect and appearance. Go on, surprise yourself: dare to experiment! At worst, you'll only have wasted a few frames of film. Often, the greatest shots come when we take the biggest risks.
 Look Up!
I've not attempted to photograph the ground displays of fireworks (which typically also feature in shows) as I consider the aerial displays far more interesting. Generally, the best vantage point for capturing the showers from the heavenward-bound rockets is somewhere quite apart from the position of the ground displays.
Race Against the Clock
Aim to set up your tripod and camera well ahead of the scheduled commencement time for the program. Check all your equipment (eg. cable release firmly in place) and camera settings (aperture, focus, etc.) Fire off a couple of test shots to be certain the film is advancing correctly.
The clock is against you, as some simple arithmetic will confirm. You'll want to take lots of shots to be certain of getting at least one where everything is "perfect". Allowing for exposures of up to several tens of seconds - to catch sufficient individual fireworks bursts - you may not even get through one roll of film for a show of typical duration.
With a (literally!) "11th hour" inspiration for an inaugural attempt at fireworks photography, I arrived at New Year's Eve celebrations in the city only to find that the swarming sea of humanity made it impossible to approach anywhere near the prime viewing locations. Running around looking for alternative vantage points wasted even more precious time. Setting up under a shop verandah (to provide shelter from the rain), I was able to take two shots before... the surprisingly short show subsided!
If time and circumstances permit, situate your tripod far from the madding crowds: for your sanity, and your equipment's safety! At one festival I attended, the best vantage point for the lens was on a minimum height tripod, positioned atop a bluestone brick wall, which itself overlooked a river. This position was fine, until close to the scheduled start time. Like bees to a honeypot, the merry-making throngs suddenly converged on my little corner of the world. It was too late to set up elsewhere. Of greatest danger to my gear were the eager, energetic and over-zealous kids (though the grown-ups weren't much better!) My enjoyment of the program was vastly diminished by having to keep a firm grip on the tripod legs for the entire duration.
Expect the Unexpected
Given that the producers of the fireworks show need to keep things moving, as well as provide some elements of surprise, your job as a photog. is made all the more difficult. You can never tell exactly what will happen next, so be prepared and react quickly to avail yourself of the best opportunities as they present themselves.
Hold Back that Light!
When there's a significant "time gap" between rocket launches, it's prudent to cover the lens (eg. with a dark hat) to prevent over-exposure either from other light sources within the scene or "light pollution" in the city. Be sure not to bump the lens/ camera (or tripod legs) when you do this.
 In the Middle of It
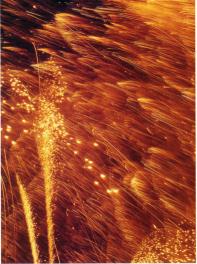
At one show, I decided to set up as close to the "action" as possible, having sussed out that the rockets would be launched from the middle of a cordoned-off oval some distance from where the crowds were assembled. I kept my promise to the ever-vigilant safety marshals that I wouldn't go onto the oval: no pic. is worth unnecessary risks! Using a "standard" (50mm) lens on a 35mm format camera pointed at a steep angle, the effect was as if you were positioned in the middle of the exploding balls of light.
One motivation for using a "normal" lens is that it's very likely to provide the best optical quality of any lens in your arsenal, regardless of manufacturer. That's because they're the simplest and cheapest to design and construct. Also, the manufacturer needs a reference lens to compare their other (later) designs against, so it's usual that a great deal of time and engineering effort goes into making the "standard" lens of high performance.
Beware Lens Flare
Normally, we recognise flare occurring when we point our lens directly at the sun. However, lens and/ or aperture flare can also occur at night, when there is a relatively bright point source of light, either included within the scene being photographed, or just outside of the frame. The resultant degradation of image quality is the same: loss of overall contrast, and/ or repeating polygons (mimicking the shape of the diaphragm blades) or "splotches" of colour, caused by refraction of light within the lens elements themselves.
It's difficult to make these out at night in your viewfinder, when the light levels are so low. During daytime, they're more readily discernible by stopping down the lens when viewing, by means of the DOF preview button (if your camera or lens has this facility). Be alert to any (relatively) intense sources of light (eg. spotlights on a river bank, powerful street lamps, etc.) and either have an effective lens shade/ hood or else ensure the lens is angled sufficiently away. Fire in the Sky
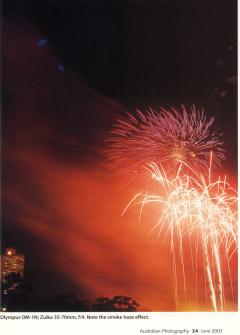
Vast volumes of smoke in the sky - remnants from the previous explosions - are strongly reflective of light from subsequent fireworks. I especially like to include these in my compositions, as they add a "soft" amorphous feel to that part of the scene, counterbalancing the clearly defined lines of the bursts. You may prefer instead to wait for the billowing smoke to dissipate. This will depend on the prevailing wind strength; in any case, it means sacrificing other (potentially spectacular) shots in the meanwhile. It's your call.
Coloured Water
With a river, lake or other body of water in close proximity to the fireworks, the option exists for recording the brightly coloured light trails and explosions as reflections. You could either incorporate these as part of the overall scene, or else choose to concentrate on the reflections in their own right, for a more abstract study. As the water will absorb some of the light, rather than reflecting all of it, you'll need to experiment by increasing your exposure (perhaps by one stop or more) compared with the exposure for the fireworks. If there are boats travelling on the water, their lights will record as horizontal trails during your time exposure.
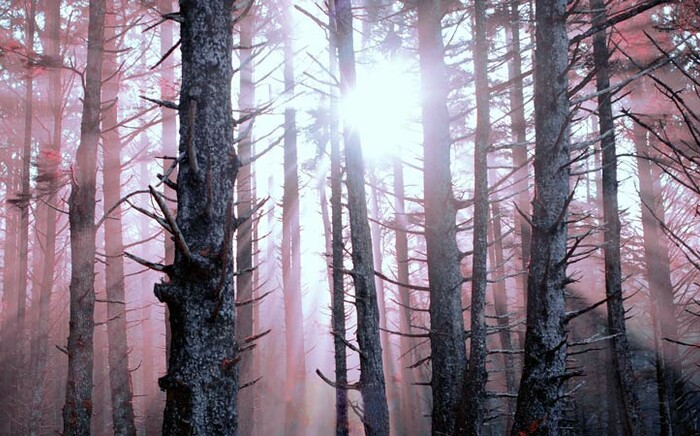
Framing Devices
As I have a particular fondness for trees, I couldn't resist creating some compositions with branches and/ or treetops impinging onto the frame when the opportunity presented itself. I felt this helped convey an extra feeling of three-dimensionality and made the picture more interesting than if I'd just included the fireworks themselves. Again, it's up to you as to your preference, although I'd recommend taking advantage of whatever alternative possibilities exist whenever you can, for completeness' sake.
 Emulsions: Whatcha Gonna Use?
When you're in close proximity to the rocket launch site, fireworks are a complete sensory experience: the acrid smell of gunpowder, the roar of the next group of missiles, the high sound pressure level of the ensuing explosions, and - of particular relevance to us photographer folk - those wonderfully colourful, brilliant and luminous displays. I much prefer using transparency (colour reversal, or slide) film to capture the richness of colour, fine detail and that certain "luminosity".
Admittedly, print (colour negative) film gives you much wider exposure latitude (read: you don't have to be nearly so careful and/ or think as much!) However, there's no print which can record the subtlety, resolution and contrast which an original tranny is capable of holding. Placing your slides on a light box allows them to really "jump out" at you, plus, you then have the option to project them or else examine with a magnifying loupe (I use an optically sharp 50mm lens for this purpose).
I like the fine detail and strongly saturated colours of a slow, high contrast transparency film (such as the ones normally recommended for landscape work).
Slicing Through Slides
Even written instructions to your Lab that you've got a roll of night sky pictures won't guarantee that the automatic slide mounting machine doesn't cut the middle of your tranny. If you can, take a "normal" picture (eg. a daytime scene) for your first frame. Then, the machine will correctly detect the frame edges for subsequent dark sky frames.
Photographer, Know thy Equipment!
Each second that the show runs for costs money, so some displays can be quite short. You certainly don't have the luxury of time to be fiddling around with your equipment and/ or devising strategies. Practice using your camera and lens(es) in a real-life situation: in darkness, and with a high level of ambient noise. When you can hardly see or hear, you're forced to rely more on "feel". Ensure, as far as possible, that you're so thoroughly conversant with your gear that you won't get "tripped up" as you race to collect those elusive, transitory images.
From reading this far, you'll have realised that you need to bring all the items of kit you require... and no more! Don't expect you'll have much time to be swapping lenses once the show starts: a zoom lens may well be a wise choice when there's no certainty as to precisely where the fireworks will be exploding.
Ideally, put a roll of film through your camera a few days' prior to the big gig. Using a loan 30 year old camera for only the second time at night, I discovered the hard way that it had an intermittent "light leak". Unfortunately, my favourite image from that show suffered fogging across the top of the frame; salvation came in the form of a tranny dupe, cropped to exclude the streak.
Catch that Buzz
Photographing fireworks is a real adrenalin rush. Your attention is on anticipating the action, as well as ensuring that you vary the shutter durations and explore various compositional options, all against the fleeting time!
Following these guidelines will enable you to return home with useable pictures; whether you're satisfied with them is a matter of personal judgement. Of course, you'll be out there at the next festivities to do even better again. Remember: you're not a real photog. unless you shoot lots of film, so keep that trigger finger strong and well exercised!
Equipment/ Film Details
Image 1 Happy New Year! Exposure set for facade (approx. 4s) Canon EOS A2E used with: Manual Exposure; Manual Focus; Spot Metering; Mirror Lock-up; Remote Cable Release; Sigma 70-300 mm, f/4-5.6 APO Macro Super Agfa CT Precisa at ISO 100
Images 2 & 3 Olympus OM20; Zuiko 35-70mm, f/4 Kodak Elite Chrome II at ISO 100
Images 4 & 5 Olympus OM-1N; Zuiko 35-70mm, f/4 Kodak Elite Chrome ExtraColor at ISO 100
Images 6 to 16 Olympus OM-1N; Zuiko 50mm, f/1.4 Kodak Elite Chrome ExtraColor at ISO 100
Images 17 & 18 Olympus OM-1N; Zuiko 35-70mm, f/4 Kodak Elite Chrome ExtraColor at ISO 100
Images 19 & 20 Olympus OM20; Zuiko 35-70mm, f/4 Kodak Elite Chrome II at ISO 100
* * * * * * *
First-hand experiences of meditation and spirituality.


interviews with Sri Chinmoy's students


Except where explicitly stated otherwise, the contents of this site are licensed under a Creative Commons Attribution-NonCommercial-NoDerivs 3.0 Unported License. read more »
SriChinmoyCentre.org is a Vasudeva Server project.